Care of ultrasonic cutters
Maintenance
Regular maintenance will ensure a longer service life.
If you experience any operation malfunction symptoms, such as the power switch is on but does not turn off, or the handpiece becomes hot, please try maintenance of the ultrasonic cutter before requesting inspection or repair.
Blade replacement
If the blade becomes dirty or deformed, replace the blade.
Blade replacement procedure
1. Make sure the power switch is off.
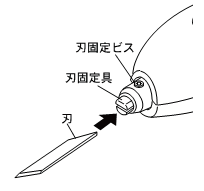
2. Loosen the blade fixing screw on the horn (the metal part at the tip of the handpiece) with the supplied hexagonal wrench, and pull out the blade fixture and blade.

3. Insert the base of the blade to be replaced to the back of the blade fixture in the direction shown in the figure below.
*Please note the direction of the blade tip and the base of the blade.
*Be sure to use the specified blade.
*Do not use blades with holes in them.
*Using a blade other than the specified one is very dangerous because it may cause malfunction, loss or drop of the blade, resulting in failure of normal oscillation.
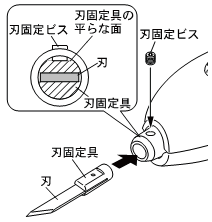
4. Align the holes of the blade fixing screws with the flat surface of the blade fixture.

5. Check that the blade and blade fixture are inserted all the way to the back, and tighten the blade fixing screw firmly with the supplied hexagonal wrench.
◆If the screw is not tightened securely, it may cause not only poor sharpness but also heat generation and malfunction of the transducer and main unit.
It may also cause the blade to jump out, which is very dangerous.
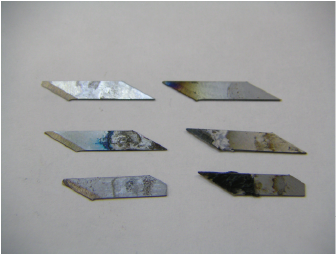
◆Replace the blade with a new one if it has become dirty or has lost its sharpness as shown in the photo at the top.
◆Do not use screws or wrenches with deformed hexagonal portions as they will be improperly tightened, and replace them with new ones.
Replacement of blade fixture
If the blade fixture becomes dirty, remove the dirt or replace it.
*The blade fixture is a consumable item.
・Blade fixture replacement procedure
1. Make sure the power switch is turned off.
2. Loosen the blade fixing screw on the horn (the metal part at the tip of the handpiece) with the supplied hexagonal wrench, and remove the blade fixture and blade.
3. Align the new blade fixture with the holes of the blade fixing screws and the flat surface of the blade fixture.
4. Check that the blade and blade fixture are inserted all the way to the back, and tighten the blade fixing screw firmly with the supplied hexagonal wrench.
◆If the screw is not tightened securely, it may cause not only poor sharpness but also heat generation and malfunction of the transducer and main unit.
It may also cause the blade to jump out, which is very dangerous.
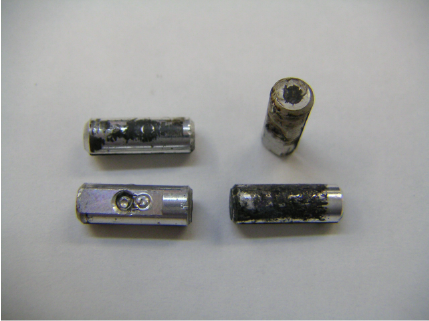
◆Replace the blade fixture with a new one if it is dirty, deformed or damaged as shown in the photo above.
◆Do not use screws or wrenches with deformed hexagonal portions as they will be improperly tightened, and replace them with new ones.
Cleaning inside the horn
Remove dirt from the inside of the horn with a cotton swab or similar tool each time the blade is replaced.
Tip: How to use the maintenance set


